Header Mine

Header Mine
Showing posts with label Sending Smiles. Show all posts

Saturday, 21 September 2024

Sending Pony Smiles

Yesterday I had the chance to go to a crafty garage sale. As I was flipping through the stamps I came across this adorable stamp from Lili Of The Valley called Me And My Pony. It is retired but anyone who knows me knows......if it's a horse stamp it is coming home with me and going in to my "collection". It was later in the day when I got back so first thing this morning I was excited to get to colouring and creating with my new stamp. Hoping this brings a smile to one of my horsey friends. 


After stamping on alcohol marker friendly paper, I coloured with Copic markers and cut the stamp out with a notched rectangle die. I used a circle punch to cut the corners to match the die.....well, I tried......they aren't perfect but they are close. I set is aside and combined patterned paper from three different companies to create my design. I added the sentiment, ribbon, enamel dots and a wood horseshoe to finish off my card. 

Stamp - Me And My Pony - Lili Of The Valley Stamps
Sentiment - Every Day Mini Sentiments - Whimsy Stamps
Patterned Paper - Gingham Galore Spring - Honey Bee Stamps
Backgrounds - Wood - Mintay 
Bright Blooms - Craft Consortium

Hammermill digital cover stock, Memento Tuxedo Black ink, notched rectangle and ticket die - Whimsy Stamps, ribbon, enamel dots, wood horseshoe - Southern Ridge Trading Co. 

Copic List

Skin - E00 E21 E11 E04
Flowers  - R81 R85 R89 YG01 YG03 YG17 G28
Hair - E50 E53 E55
Pony - E15 E17 E19 E29 T2 T4 T6 T8 
Stall Door, Mouse, Boots - E34 E35 E29
Grass - YG17 G28
Pants - B91 B93 B95 B97
Apples - R14 R17 R29 YG97 
Shading C0 C1 C2 B000

Thanks for popping by! Have a great day!


Thursday, 14 March 2024

Lazy Daisy Gift Set

 We have had a lot of spring type weather where I live. Normally we are covered in a ton of snow at this time of year, but this year we have had a lot of sun and double digit temperatures. It feels like spring and spring to me means flowers!! 

I planted some daffodil bulbs in the summer and they have started to come up already! I am hoping the little bit of snow and freezing temperatures we had on the weekend don't kill them but somehow I think they will be alright. The new daffodils and a tulip coming up inspired my cards for this week. I decided to do a card gift set featuring the Lazy Daisy Lady Bug stamp and a number of sentiments from High Hopes Rubber Stamps. Am I the only one ready to see some spring flower beauty in the flower beds? 


After stamping the image 5 times on alcohol marker friendly paper, I coloured them with Copic markers and cut them out using a square die. Next, I grabbed my Misti and some of my favourite High Hopes sentiment and stamped each daisy with it's own sentiment. Truth be told, the two smaller Just A Note cards are the result of a sentiment I masked off that I didn't stamp straight, so I trimmed them down to create two smaller cards. I wanted to keep the design clean and simple for this set and added them to a piece of black card stock. There are three 4.5" x 4.5" cards and two approximately 4" x 3.25" cards in this set and I am hoping someone in my life will be able to use them. 

 
Stamp Recipe
Stamps - Lazy Daisy Lady Bugs (J111)- High Hopes Rubber Stamps
Sentiment - You Make Me Smile (FDG015), Sending Smiles (G276), Just A Note (DLL003) - High Hopes Rubber Stamps


Memento Tuxedo Black ink, Hammermill Digital Cover Card Stock, black card stock, square die

Copic Markers
Stem - YG01 YG03 YG17
Centres - Y11 Y15 YR23
Petals - C0 C1 C2
Lady Bugs - T2 T4 T6 R05 R17 R39
Outline - B000


Thanks for stopping by! Have a super fantastic day!

Thursday, 21 September 2023

Fairy Smiles

 It has been awhile since I added to my Thinking of You, Just Because card stash and it is getting low so I decided to add to my stash with this card featuring "Fairy On A Log" from High Hopes Rubber Stamps in some fall colours. I love to send a card to a friend or family member I haven't been able to connect with for awhile. 


After stamping on alcohol marker friendly paper and colouring with Copic markers, I hand fussy cut the stamp leaving a thin white edge. I added some sparkle pen to her wings and the flower petals. 
 Patterned paper from Simple Stories and Honey Bee Stamps were perfect for my card so I cut them to fit my 4.25" x 5.5" base. All paper is edged with ink to help the layers pop. I stamped the sentiment and cut it out with a sentiment strip and cut a matching piece of card stock to go behind it. The stamp is added to the card front with foam pop dots and the card is finished off with enamel dots. 

Stamp Recipe
Stamps - Fairy On A Log (SLF030)- High Hopes Rubber Stamps
Sentiment - Sending Smiles (G276) - High Hopes Rubber Stamps
Patterned Paper - Autumn Afternoon - Honey Bee, Simple Vintage Great Escape - Simple Stories

Memento Tuxedo Black ink, Hammermill Digital Cover Card Stock, enamel dots, Toffee Crunch Memento Ink, foam pop dots, large labels - Spellbinders, sentiment strip - Whimsy Stamps, Spectrum Clear Sparkle Pen

Copic Markers
Log/Hair  - E34 E35 E29
Skin - E00 E21 E11 E04 R20
Mushrooms- E08 E09 E18 E41 E42 E57
Dress - G40 G43 G24 BG96
Flower - Y21 YR21 YR24 E34 E35 E29 
Grass - G43 G24 BG96
Shoes - E41 E42 E57
Wings - E40 E41 E42 blender

Thanks for stopping by! Have a super fantastic day!

Tuesday, 3 January 2023

Hedgehog Smiles

 Happy New Year! I hope you all had a Merry Christmas and a Happy New Year. Mother Nature blessed us with a blizzard so our Christmas got pushed out by a few days but it was good! 

I have decided to start the new year with a smile. My card features "Hedgie Stack" from High Hopes Rubber Stamps. These two just make me smile and this stamp is one of my favourites. My goal this year is to send out more of this kind of card to bring a smile to whomever needs it. 


After stamping these cuties on alcohol marker friendly paper I coloured them with Copic markers and cut them out using a loopy frame die. It is really hard to see in the photo but I used a cloud die cut and some ink to add some clouds in the background. Next time I will use a darker blue ink. 
I chose some paper from my stash and Honey Bee Stamps for this card. The flower paper was cut using a banner die and I traced around the outside of the die and cut it for the card stock frame to mount it on and added some ribbon before gluing it down. 
For something different, I cut the bottom of the banner again using white card stock and used the negative piece to stamp the sentiment on. Some enamel dots and a bow finish off my card. 

Card Details
Stamps - Hedgie Stack (TDG027) - High Hopes Rubber Stamps
Sentiment - Sending Smiles (G276)
Patterned Paper - Playful Pastels - Honey Bee Stamps, wood paper - stash

Memento Tuxedo Black ink, Hammermill Digital Cover Card Stock, banner die - Sizzix banner die #3, bashful blue Stampin' Up ink, cloud die - Quickutz, loopy frame die - Gina Marie Designs, ribbon, enamel dots. 

Copic Markers
Hedgehogs - W1 W3 W4 W7 E50 E51 E53 E55 R20 R21
Flowers - V12 V15 V99 Y08
Branch - E30 E31 E43 E44 
Leaves - G40 G85 G28


Thanks for stopping by! Have a super fantastic day!


Thursday, 8 April 2021

Butterfly Smiles

  I can never have too many Just Because type cards in my stash. "Butterfly Chick" from High Hopes Rubber Stamps is a fun, versatile image that makes me smile and I hope it will do the same for the person I send it to.

I challenged myself to step out of my square card comfort zone and went on the hunt for a different shape of card. Slimline cards are quite popular in the crafting world but the mini slimline style peeked my curiosity. There are a couple different sizes out there but the finished size of 3" x 6" fit my stamp the best. I am very happy with the end result and I see more of this style in my future. 


After stamping my image, I coloured it with Copic markers and hand fussy cut it leaving a thin white edge. Next I found some paper from two different collections from Lawn Fawn that worked together and cut them to size. I used a stitched scalloped edge to cut the edge of one piece for some added interest. 
Next I stamped the sentiment and cut it out using a fish tail banner die. I added the stamp to the card using foam pop dots and added some ribbon over the corner and enamel dots to finish off my card. 

Card Recipe 

Stamp: Butterfly Chick - High Hopes Rubber Stamps

Sentiments: Sending Smiles - High Hopes Rubber Stamps

Patterned Paper - Really Rainbow Christmas, Spiffy Speckles - Lawn Fawn  


Tuxedo Black Memento ink, Hammermill 100lb digital cover stock, fish tail banner die - Your Next Stamp, Offray ribbon, stitched scallop edge - Kat Scrappiness, enamel dots, 3D foam pop dots


 Copic Markers:

Chick - Y13 Y08 Y26 Y21 Y35 Y38

Bow - BG01 BG05 BG09

Butterfly -N1 N2 N3 N5 Y21 Y35 Y38

Grass -YG01 YG03 YG17


Thanks for stopping by! Have a super fantastic day!


Thursday, 3 December 2020

Christmas Smiles

 Santa gets his picture taken a lot over the Christmas season. Did you know he does practice photo shoots!?! 

Santa Portrait and Three Pane Santa from High Hopes Rubber Stamps have caught him having some fun and practicing to get his smile and the twinkle in his eye just right! 


After stamping and colouring my stamps I hand fussy cut each one and ran a black marker around the edge to get any white I may have missed. I added some Star Dust Stickles to the hats and set them aside to dry. Patterned paper from Photo Play was perfect for this fun design. 
I didn't have a polaroid die that was small enough for my design so I cut a piece of card stock to the size I needed and then used a square die to cut out the "portrait" space. 
My film strip die is larger then the three pane Santa's so I cut a strip of card stock and patterned paper and added the panes in kind of a faux film strip and added two of the three Santa's to it. The third Santa was added in the top corner with a banner die behind him. I did some creative masking to combine two different sentiment stamps to make the sentiment. 
Some ribbon, snowflakes, a camera charm and enamel dots finish off my card. 

Card Recipe 

Stamp: Santa Portrait, Three Pane Santa  - High Hopes Rubber Stamps

Sentiment: Sm. Christmas Script, Sending Smiles - High Hopes Rubber Stamps

Patterned Paper: Kringle & Co - Photo Play 


Tuxedo Black Memento ink, Hammermill 100lb digital cover stock, film strip die - YNS, snowflake die - Memory Box, ribbon - stash, camera charm - stash, square die - Spellbinders, enamel dots, Star Dust Stickles


 Copic Markers:


Hats, Mitts, Suits - R24 R27 R37 R59

Faces - E00 E21 E11 R20 white gel pen

Beards - C0 C1 C2 

B00 


Thanks for stopping by! Have a super fantastic day!


Monday, 21 September 2020

Hummingbird Smiles

I am in love with this hummingbird stamp from High Hopes! I love colouring flowers and birds so this stamp had to be added to my collection! I also got in touch with my CAS (clean and simple) side - this type of card is always a challenge for me and I have to literally sit on my hands to not keep adding things. 
I will colour this one up again as it is a versatile stamp that can be used for many occasions - I'm thinking birthday card at the moment <wink>.


I stamped this gorgeous stamp with Memento Tuxedo black ink, coloured it with alcohol markers and hand fussy cut it leaving a thin white edge. Next I grabbed some baby blue ink, a cloud die and a dabber and created my cloud background. I cut a piece of white card stock to size and used a circle die to cut out a "window". 
After temporarily placing things on the base I used my Misti to stamp the sentiment directly on to the cloud background and then glued down my coloured image. 

Card Recipe 

Stamp: Hummingbird - High Hopes Rubber Stamps

Sentiment: Sending Smiles - High Hopes Rubber Stamps


Tuxedo Black Memento ink, Hammermill 100lb digital cover stock, circle die - Kat Scrappiness, Bazzill card stock, cloud die - Quickutz, baby blue ink - Memories


 Copic and Spectrum Noir Markers:


Hummingbird - BG05 BG07 BG09 R37 R59 Y35 Y38

Leaves - G07 DG3 JG6

Flowers - RV11 RV32 RV34


Thanks for stopping by! Have a super fantastic day!


Thursday, 23 July 2020

Willa Smiles

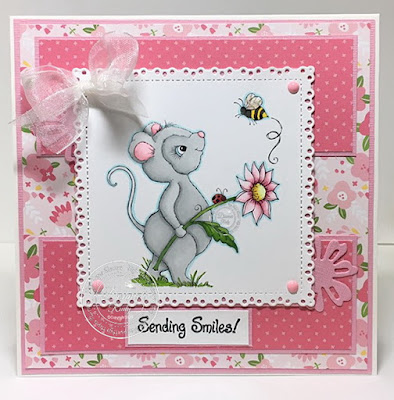
Willa is absolutely adorable and makes me smile. I have had a few experiences with mice in my home and office but none of them are as cute a Willa from the new release! I love her big smile and can't help but smile with her. I hope the person who receives this card will smile too!


I coloured the adorable Willa with alcohol markers and cut her out using a pleated lace square die. There is some Twinkle Stickles on the bee wings just for a little bit of bling. 
Next I grabbed some patterned paper from Lawn Fawn and cut them to size for my design. I added some die cut flowers in two of the corners and finished my card off with a bow and enamel dots. 

Card Recipe 
Stamp: Willa with a Flower - High Hopes Rubber Stamps
Sentiment: Sending Smiles - High Hopes Rubber Stamps
Patterned Paper: Spring Fling - Lawn Fawn

Tuxedo Black Memento ink, Hammermill 100lb digital cover stock, pleated lace square die - Gina Marie Designs, ribbon, enamel dots, flower die - Funky Foliage Tim Holtz, Twinkle Stickles

 Copic and Spectrum Noir Markers:

Willa - IG1 IG3 RV000 RV11 B01
 Prismacolor pencils for shading Cool Grey 10% 50%
Flower - RV000 RV11 PP5
Flower Stem/Leaf - YG25 YG17 
Flower centre - Y00 CT1 CT4 Y26
Lady Bug - R17 R29 black
Bee - W7 black CT1 CT4
Outline - B00


The High Hopes Design team posts daily inspiration on Facebook and the High Hopes blog - we'd love for you to pop by for a visit! Inspiration can also be found on the High Hopes Instagram and Pinterest pages! 
                                                               
Thanks for stopping by! Have a super fantastic day!